
One of the things I enjoy doing when visiting another city is taking public transit from the airport. Even more enjoyable to me is taking public transit from an airport in a city where public transit isn’t typically thought of as an option. Last winter, for example, I went on a trip to Las Vegas and took the bus from the airport to my hotel on the Las Vegas Strip. The vast majority of people opt for an Uber in this situation, but I found the bus to work out very well for what I thought was a very enjoyable experience at a fraction of the cost (admittedly, I’m really not a fan of being in an Uber, since I find them awkward and uncomfortable).
Which brings me to a trip I took a few months ago, where my family (2 adults, 2 little kids) went to Epic Universe in Orlando over President’s Day Weekend. One of the limitations when traveling with little kids is that you can’t rely on Uber or Lyft to get around unless you’re bringing car seats with you. In a place like Orlando, getting to the resorts from the airport typically means signing up for a shuttle bus or renting a car.
On our last visit to Orlando to go to Disney World, we used the Mears Express Shuttle, which is a shuttle service that Disney contracts out. This shuttle service cost us $16 per adult each way and $13 per kid each way. For a family of four, that meant a round trip from the airport was $116 – not a small sum to pay for transportation. To make matters worse, the shuttle was also very slow. First, we had to get in a long line at the airport and wait to get on the bus (this took about 30-45 minutes). Then the shuttle bus had to drop off guests at all of the different resorts. We got unlucky because our resort was the last one on the route, so the bus ride itself ended up taking about an hour. Couple that with the long wait time to get on the bus, and it wasn’t the most pleasant experience.
For our trip to Universal, we once again had to figure out how to get to our resort from the airport. Universal does offer a shuttle service for $39 per person round-trip, which is what I initially considered doing and what was recommended by a lot of people online. Some online reviews had the same issues as I had with the Disney resort buses, where it took a long time with all the stops it had to make, along with the wait time to get on the bus itself.
But then I noticed that there was a regular city bus from the airport that had a bus stop right outside the hotel we were staying at. I couldn’t find any information about taking a regular bus to the hotel, so I was on my own to figure out if this would work. At just $2 per person (and free for kids), this was clearly the most affordable way to get to where I needed to go.
Preparing For The Bus Ride
Figuring out how to get around via bus is a bit of an art form, with three main challenges to consider (especially when it comes to taking a bus in a new city). These include the following:
- How do you pay for the bus?
- When does the bus arrive?
- Where does the bus go?
Fortunately, with phones and apps, this is all very easy to address. Before I arrived in Orlando, I had already figured out which bus would get me from the airport to the resort and how I would pay for the bus. When it comes to figuring out how to get somewhere via mass transit, I typically start with Google Maps, which does a good job of providing general directions on how to get where you need to go via transit. Google Maps won’t always give you the best directions when it comes to taking buses and trains, but it will give you a good idea of what your transit options are and approximately how long it’ll take you to get to your destination.
In this case, after searching Google Maps for directions, I discovered that the 311 bus would get us to the resort, although it told me to get off at a stop that wasn’t quite as close to the hotel as I had hoped. This is when I turned to my favorite transit app, aptly named Transit. Transit app allows you to look at each individual transit line and see all the stops along the way, as well as the exact route, timetable, and, if the city has it, GPS locations of each bus on the route. Looking through Transit app, I saw that the 311 bus arrives every 30 minutes and that there was a closer stop to the resort that Google Maps seemed to miss.
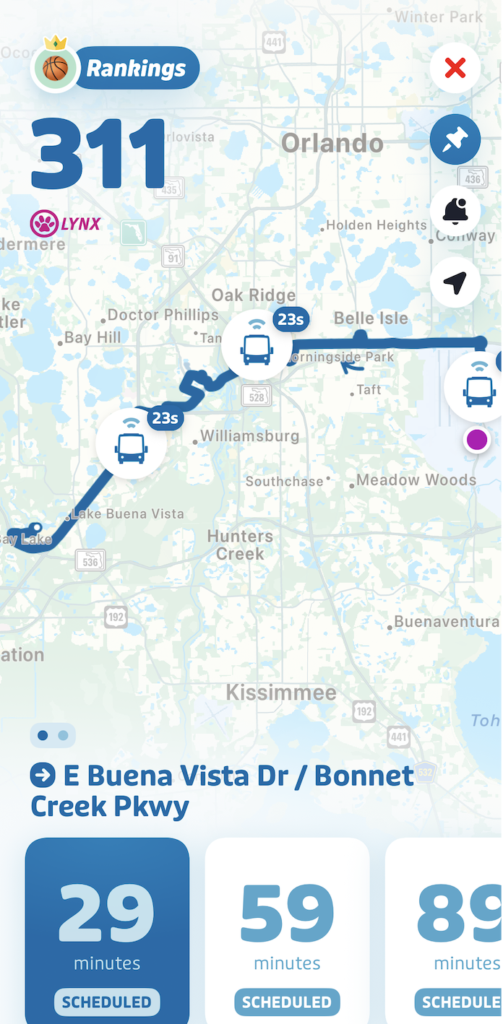
Once I had the bus route planned out, the next step was to figure out how to pay for my ride. A major issue with many bus systems is that there often isn’t a simple way to pay for the fare unless you carry physical cash and have exact change, which is something I (and most people) never have. Fortunately, most transit systems these days have apps that let you pay for fares using your phone. In this case, the Orlando bus system – called Lynx – has an app that lets you pay for your fare with your phone. You then scan the ticket from your phone at the fare reader when you board the bus. And at just $2 per person (and free for kids), it’s a cheap ride.
Taking The Bus From The Airport To The Resort
I’ve been to the Orlando Airport before, so when I arrived, I knew exactly where to catch the bus. However, Lynx buses, I’ve discovered, aren’t always the most reliable. When I arrived at the stop, I found the 311 bus waiting with a scheduled departure time in 10 minutes – perfect timing! However, the bus doors were closed, and there was no driver around. I figured the driver was probably taking a bathroom break, but the scheduled departure time came and went, and there was still no bus driver around. Finally, about 15 minutes after the bus was scheduled to depart, I saw the bus driver come out of the airport terminal with a Starbucks in hand – and not particularly in a hurry either.
Finally, about 15 minutes after our scheduled departure time, we were off on our 40-50 minute journey to the resort. Interestingly enough, I didn’t see any other people on the bus who seemed to be tourists heading to their hotel. Everyone else appeared to be locals going home from their jobs at the airport.
The bus ride itself was smooth enough. I used the Transit app to follow the bus route and make sure that I wouldn’t miss my stop. As we neared our stop, I hit the stop request button, and we ended up getting off at a bus stop on the side of what was essentially a highway. I think I might have been the first person to get off at this stop because the bus driver had to make a fairly hard stop, as if they’d never stopped at this bus stop before. The bus stop was as bare bones as you could get – literally a pole in the grass.
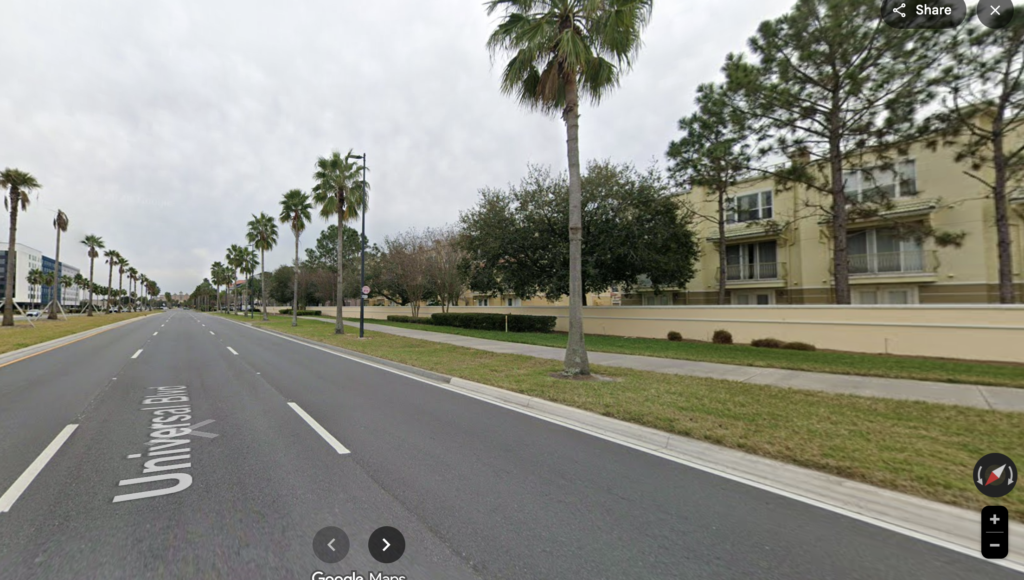
Getting to the resort itself from this location was also interesting. The bus stop is across the street from the resort that we were staying at, but the nearest crosswalk required us to cross the street three times to get to the other side. Our other option was to scurry across a very large road. We opted to take the long way around since we had bags and little kids with us.
Once we did get to the other side, we then had to figure out how to get to the lobby from the street. These resorts clearly do not expect anyone to arrive by bus or on foot, so we ended up walking around looking for a way to get inside since the entire property was fenced off. Fortunately, we found someone walking out who let us in, and from there, we were able to make our way inside to the lobby. I did discover later that there was a little sidewalk path going around the side of the building near the loading docks that also led to the front, although this was not easy to find.
All in all, the trip to the resort from the hotel was a success. I found it enjoyable and fast, and the bus ride was pleasant. It was probably as fast a trip as if we’d taken the Universal shuttle service. And at just $4 total for all of us, it was a definite bargain.
Returning To The Airport At The End Of Our Trip
Returning to the airport was a trickier matter because, unlike our bus ride to our hotel, we had to be at the airport by a specific time so as not to miss our flight. With the bus on 30-minute headways, missing a bus meant we ran the risk of getting to the airport late and possibly missing our flight.
The evening before, I scouted out the bus stop location to make sure I knew how to get to it. I found the path that went around the side of the hotel near the loading docks, and then it was a quick walk over to the bus stop. Below is what this bus stop looked like:
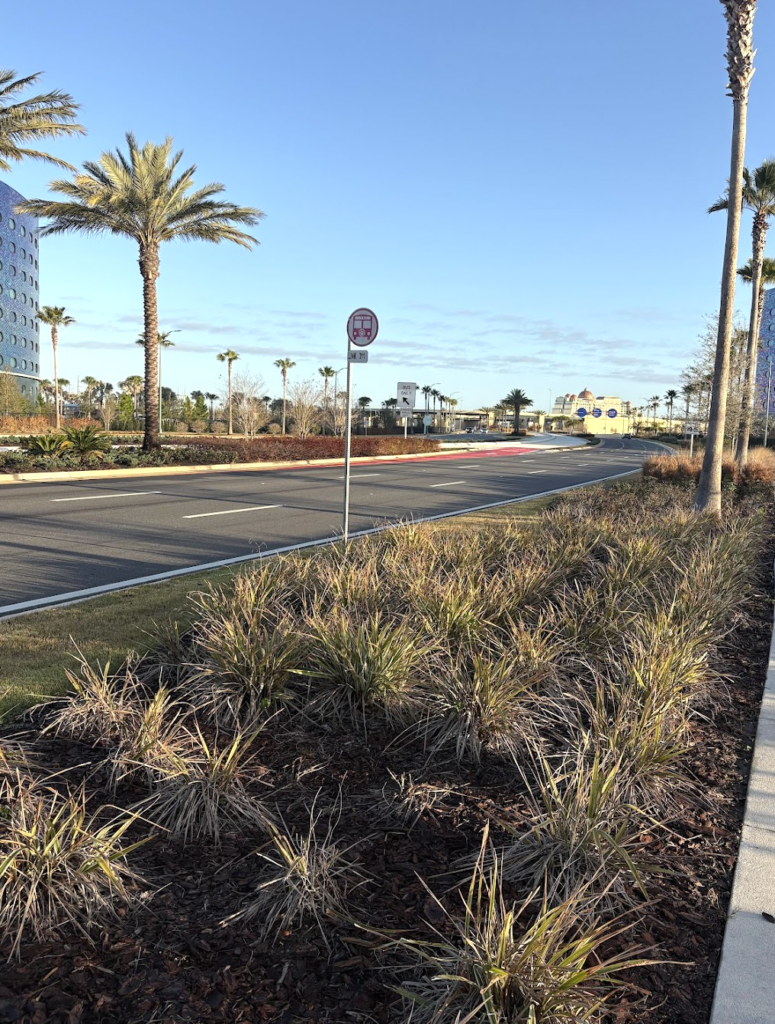
I’m absolutely convinced that I’m the first person ever to use this bus stop. As you can see, the bus stop consisted of a pole in the ground, behind a bunch of landscaping, requiring you to walk through the landscaping to get to the bus stop. If you were in a wheelchair, you wouldn’t even be able to use this stop.
The bus itself arrived in a weird way. I could see where it was via the GPS, so I knew it was coming, but then, as it got near our stop, the bus made a sudden turn off the designated route and went down a different road. This was alarming to me, as it looked like the bus was going to skip our stop and continue onwards to a different part of the route. Following a bus via GPS also doesn’t always provide the most accurate real-time location because it’s usually about 30-60 seconds behind, so I wasn’t sure where it went for a little while, but fortunately, the bus did suddenly appear, albeit turning to our bus stop from the wrong street. I’m still not sure why it made that detour.
The trip back to the airport was easy enough. I paid for the fare using the app ($4 total for the four of us). And the bus made it back to the airport on time, giving us plenty of time before our flight. As I expected, there wasn’t a single tourist on the bus other than us – everyone else we saw on the bus looked to be people who worked at the airport.
In the end, we got to the airport and back, for a family of four, for just $8 total, and probably faster than if we’d used the shuttle service.
Why All This Matters
Other than explaining how we were able to use the bus to get to our Universal resort hotel from the airport, I think it’s worth considering why doing something like this matters. One of the things I’ve always thought differentiated the financial independence community – or really anyone looking to make dramatic changes to their lives – is being willing to do things differently from others. It’s why I ride a bike as my primary mode of transportation, for example. The financial independence community is special because most of the people in it are willing to do things differently from the norm.
When I initially did my research on how we’d get to the resort, I searched the Facebook and Reddit groups to see how others tackled this transportation problem. Every post I found said the same thing – that the only way to get to the resorts from the airport was to either book the Universal shuttle service or rent a car and pay for parking at the hotel. Not a single person mentioned taking the bus.
Taking the bus to get to the Universal resorts should be a normal thing. Unfortunately, it isn’t because of the way Orlando is designed. But the option is there, and I was willing to put in the legwork to figure out how to do it
Saving the money is nice, but I think doing something like this is about more than that. It’s about being able to think outside the box and figure things out in a way that most people don’t think is possible. And I’m setting an example too – my kids see us do this and think this is normal. Maybe they’ll carry that way of thinking into their own lives in the future.
It’s a silly story – and not that big a deal in the grand scheme of things. But I think it’s worth sharing. And maybe someone in the future might run into this post and copy what I did.
This post may contain affiliate links.
More Recommended Ebike/Scooters
Check out these other ebikes and scooters I've reviewed:
- Urban Arrow Ebike – Last year, I made one of the largest purchases I’ve ever made – I bought a $9,000 electric cargo bike from Urban Arrow. In my Urban Arrow review, I will discuss what it is and why I decided to buy this bike, as well as discuss how impactful a bike like this can be on your journey to financial independence.
- Troxus Explorer Step-Thru Ebike – The Troxus Explorer Step-Thru is a fat-tire ebike that I’ve had the pleasure of riding for a while now. It has amazing power, great looks, and awesome range. If you’re looking for a great fat-tire ebike that offers a lot for the price, the Troxus Explorer Step-Thru is definitely one for you to consider. Check out my Troxus Explorer Step-Thru Review.
- Hovsco HovBeta Ebike – The HovBeta is a folding ebike with great specs and a lot of interesting features, and importantly, it’s sold at a good price point. I’ve had a blast commuting with it and using it to do deliveries with DoorDash, Uber Eats, and Grubhub. Check out my Hovsco HovBeta Ebike Review.
- Vanpowers Manidae Ebike – The Vanpowers Manidae is a fat tire ebike that I’ve been riding as my primary winter commuting bike and have also been using it to do food delivery with apps like DoorDash, Uber Eats, and Grubhub. After clocking in a decent number of miles with this ebike, I wanted to write a post sharing what my experience with the Vanpowers Manidae ebike has been like. Check out my Vanpowers Manidae Review.
- Sohamo S3 Step-Thru Folding EBike Review – A Great Value Folding Ebike – The Sohamo S3 Step-Thru Folding Ebike is an entry-level folding ebike that offers a lot of value for the price point. I’ve been riding the Sohamo S3 for a while now, putting the bike through its paces, and I have to say, this bike has exceeded all of my expectations. Check out my Sohamo Review.
- KBO Flip Ebike – The KBO Flip is an excellent bike. I’ve had a great time riding it and think it’s a versatile bike that can be used for a lot of purposes and can fit a variety of lifestyles. It’s worked out great for me as a general commuter bike and as a food delivery bike. Check out my KBO Flip Review.
- Hiboy P7 Commuter Ebike – The Hiboy P7 is an excellent electric commuter bike that’s offered at an affordable price point. The range and speed of this bike are both very good, so you won’t have any trouble getting anywhere you need to go with it. As a food delivery vehicle, this is also good – with how much range it offers, you’ll be able to work all day on a single charge. Check out my Hiboy P7 Commuter Electric Bike Review.
- Himiway Escape Ebike – The Himiway Escape is an interesting bike for anyone looking for a moped-style ebike. If you’re a gig economy worker, the Himiway Escape is particularly interesting and it’s possible to think of it as an investment, especially if you can opt to do deliveries with the Himiway versus using a car. It’s not cheap, but you can definitely make your money back when you compare the mileage you’ll put on your car versus using an ebike. Check out my Himiway Escape Bike Review.
- Espin Sport Ebike – The Espin Sport is a good ebike for someone who is looking for an ebike that feels and rides more like a regular bike. There are many ebikes that are really only bikes in name. In reality, they’re basically electric mopeds. The Espin Sport, by contrast, is a bike you could probably ride without the battery and you’d feel like you’re just riding a regular bike. Check out my Espin Sport Review.
- Varla Eagle One Scooter – The Varla Eagle One is an excellent scooter that can make sense for a lot of people. It can work as a primary mode of transportation. You can use it to work on gig economy apps like DoorDash, Uber Eats, and Grubhub. And it can also be a recreational vehicle if you’d prefer to use it for that. Check out my Varla Eagle One Review.
- Varla Falcon Scooter – The Varla Falcon is an excellent scooter that offers a good amount of power at a lower price point compared to more powerful scooters. It’s not exactly an entry-level scooter, nor is it a high-powered scooter. I think it fits somewhere in-between those two categories – an intermediate scooter if I had to give it a category. Check out my Varla Falcon Review.
- Hiboy S2 Scooter – The Hiboy S2 is an excellent entry-level commuter scooter that's perfect for someone looking to save some money in transportation costs and improve their commute. Check out my Hiboy S2 Review.
- Hiboy S2R Scooter – The Hiboy S2R is one of the more interesting electric scooters I’ve been able to test out. It’s not a high-powered scooter, but for an everyday transport option, it’s very useful, especially given some of the unique features that it has. Indeed, for the price, the Hiboy S2R might be the best value scooter I’ve used. Check out my Hiboy S2R Review.
- Fucare H3 Scooter – The Fucare H3 is a fun scooter and I’ve enjoyed testing it out. For a daily commuter or quick trips or errands, the Fucare H3 is probably the scooter I’ll use. It’s portable and easy to maneuver, so it’s just easier to take on the road when I need it. Check out my Fucare H3 Scooter Review.
More Recommended Investing App Bonuses
For additional investing app bonuses, be sure to check out the ones below:
- M1 Finance ($75) – This is a great robo-advisor that has no fees and allows you to create a customized portfolio based on your risk tolerance. You also get $75 for opening an account. Check out my M1 Finance Referral Bonus – Step-By-Step Guide.
- SoFi Invest ($25) – SoFi Invest is an easy brokerage account bonus that you can earn with just a few minutes of work. Use my SoFi Invest referral link, fund your SoFi Invest brokerage account with just $10 and you’ll get $25 of free stock. I also have a step-by-step guide for the SoFi Invest referral bonus.
- Robinhood (1 free stock) – Robinhood gives you a free stock valued between $2.50-$225 if you open an account using my referral link.
- Public (1 free stock) - Public gives you a free stock valued between $3-$70 if you open an account using my referral link.
More Recommended Bank Account Bonuses
If you’re looking for more easy bank bonuses, check out the below options. These bonuses are all easy to earn and have no fees or minimum balance requirements to worry about.
- Ally Bank ($100) – Of all the banks out there, Ally is, without a doubt, my favorite. At the moment, Ally is offering $100 to customers who open an eligible Ally account and meet the requirements. Here are the step-by-step directions to earn your Ally Bank referral bonus.
- Chime ($100) - Chime is a free bank account that offers a referral bonus if you use a referral link and complete a direct deposit of $200 or more. In practice, any ACH transfer into this account triggers the bonus. This bonus is easy to earn and posts instantly, so you’ll know if you met the requirements as soon as you move money into the account. I wrote a step-by-step guide on how to earn your Chime referral bonus that I recommend you check out.
- US Bank Business ($400/$1200) – This is a fairly easy bank bonus to earn, since there are no direct deposit requirements. In addition, you can open the Silver Business Checking account, which comes with no monthly fees. Check out how to earn this big bonus here.
- Current ($50) – Current is a free fintech bank that’s offering new users a $50 referral bonus after signing up for an account using a referral link. Current is an easy bonus to earn and also gives you access to three savings accounts that pay you 4% interest on up to $2,000. That means you can put away up to $6,000 earning 4% interest. That’s very good and makes Current an account I recommend to everyone. Check out my step-by-step guide on how to earn your Current Bank bonus.
- Novo Bank ($40) - Novo bank is a free business checking account that’s currently offering a $40 bonus if you open a Novo business checking account using a referral link. In addition to being a good bank bonus, Novo is also a good business checking account. It has no monthly fees or minimum balance requirements and operates a good app and website. Indeed, it’s the business checking account I currently use for this blog. Check out my post on how to easily open a Novo account.
- Varo ($25) – Varo is a free fintech banking app similar to Chime or Current. It’s currently offering a $25 bonus to new users that open a new Varo account with a referral link. The bonus for this bank is very easy to meet, all you need to do is spend $20 within 30 days of opening your Varo account. Check out my step-by-step guide to learn how to earn this bonus.

Kevin is an attorney and the blogger behind Financial Panther, a blog about personal finance, travel hacking, and side hustling using the gig economy. He paid off $87,000 worth of student loans in just 2.5 years by choosing not to live like a big shot lawyer.
Kevin is passionate about earning money using the gig economy and you can see all the ways he makes extra income every month in his side hustle reports.
Kevin is also big on using the latest fintech apps to improve his finances. Some of Kevin's favorite fintech apps include:
- SoFi Money. A really good checking account with absolutely no fees. You'll get a $25 referral bonus if you open a SoFi Money account with a referral link, and an additional $300 if you complete a direct deposit.
- 5% Savings Accounts. I'm currently getting 5.24% interest on my savings through a company called Raisin. Opening a Raisin account takes minutes to complete, it's free, and all of your funds are FDIC-insured. I explain how it works, why I'm now using it to store my emergency fund and any other cash savings I have, and why I recommend everyone check it out in this review.
- US Bank Business. US Bank is currently offering new business customers a $400/$1200 signup bonus after opening a new account and meeting certain requirements.
- M1 Finance. This is a great robo-advisor that has no fees and allows you to create a customized portfolio based on your risk tolerance. You also get $75 for opening an account.
- Empower. One of best free apps you can use to monitor your portfolio and track your net worth. This is one of the apps I use to track my financial accounts.
Feel free to send Kevin a message here.
This is great! My wife and I are the same way. Always excited to be able to utilize public transit options like the bus or trolleys whenever we can. Never knew about the Transit app. Thanks for sharing and will try that one out next time we are out traveling!
Public transportation is always the cheapest and most environmental choice. Thank you for promoting it! The more people choose it, the better it becomes. You might consider filing a complaint about the shrubbery and poor signage to encourage them to do better for the next user.